
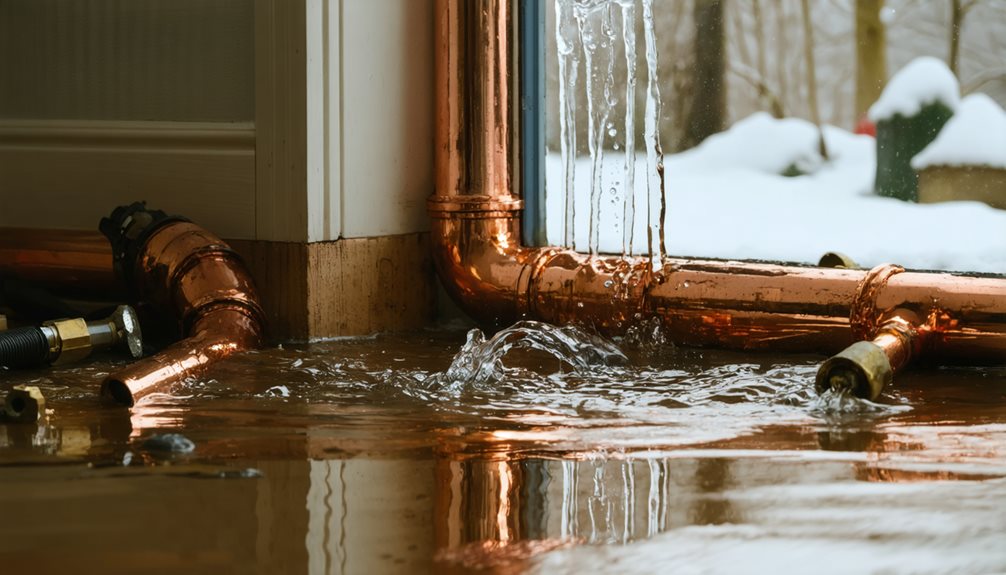
If you discover a burst pipe, immediately shut off your home’s main water valve and open all faucets to drain the system. Turn off electricity to affected areas, then place buckets under leaks and use towels to contain water spread. Document everything with photos and videos for insurance purposes, and contact a licensed emergency plumber right away. Take steps to start drying affected areas quickly to prevent mold growth. The following essential tips will help you minimize damage and protect your property.
Key Takeaways
- Immediately shut off the main water valve and open all faucets throughout your home to drain the remaining water.
- Document the damage by taking photos and videos before cleanup, and contact your insurance company right away.
- Turn off electricity in affected areas and use buckets, towels, and absorbent materials to contain water spread.
- Contact a licensed emergency plumber for professional repair, especially if flooding affects multiple rooms or electrical systems.
- Use fans and dehumidifiers to dry affected areas within 3-5 days to prevent mold growth and further damage.
Immediate Steps to Stop Water Flow
Four vital actions must be taken immediately when a pipe bursts in your home. First, locate and shut off your main water shutoff valve, typically found near the water meter, under the kitchen sink, or in utility areas. Second, if the burst involves hot water, turn off the valve on top of your water heater. Third, verify the shutdown’s effectiveness by checking that water has stopped flowing from all faucets. After shutting off the water supply, open all faucets throughout your home to help drain any remaining water from the system.
As part of emergency preparedness, you should familiarize yourself with your valve’s location before a crisis occurs. It’s usually marked with a stop tap and may be outside, in the basement, or near major appliances. Quick access to this valve is essential during emergencies, as every second counts in preventing extensive water damage to your property.
Draining the Plumbing System
After shutting off the main water supply, you’ll need to systematically drain your home’s plumbing system to minimize damage from the burst pipe. Begin these drainage techniques by turning on all faucets throughout your house, including both hot and cold water lines. Don’t forget outdoor spigots if they’re connected to your main system. Quick draining action can significantly reduce the potential for costly water damage to your home.
Your plumbing maintenance should include flushing all toilets and draining their tanks completely. Next, turn off your water heater and run the hot water taps until they’re dry. Pay special attention to water-using appliances and basement fixtures that require draining. This systematic approach reduces pressure throughout your plumbing system, preventing additional damage and preparing the area for repairs. It’s essential to be thorough, as any remaining water can continue to stress the compromised pipe and potentially cause secondary issues.
Emergency Damage Control Measures
Once your plumbing system is drained, immediate action to control the damage becomes your top priority. Emergency preparedness means documenting everything while taking steps to minimize water damage. Grab your phone and capture clear photos of the burst pipe and affected areas before starting your plumbing maintenance response. A thorough inspection by a repipe specialist can determine if more extensive repairs are needed.
- Place buckets under the leak point to catch remaining water
- Use towels and absorbent materials to contain the spread
- Turn off electricity in affected areas to prevent hazards
- Start drying out wet areas immediately to prevent mold
- Consider applying a temporary patch for small cracks
Don’t discard any damaged items until your insurance company assesses the situation. If you’re dealing with extensive flooding, contact professional water damage restoration services immediately. Keep detailed records of all steps you’ve taken to address the emergency.
Professional Help and Support
Determining when to seek professional help for a burst pipe can mean the difference between a quick resolution and extensive property damage. You’ll need immediate emergency response if you notice flooding across multiple rooms, water near electrical systems, or if you can’t locate the burst’s source.
Licensed plumbers offer significant advantages, including specialized leak detection equipment and 24/7 availability. They’ll conduct thorough plumbing inspections to identify vulnerable areas and implement preventative measures against future bursts. When selecting a professional, verify their credentials, certifications, and customer reviews. Da Vinci’s Best Plumbing provides reliable service for urgent winter pipe emergencies.
Watch for key indicators that signal professional intervention: extensive water damage, safety hazards involving electricity, hidden leaks within walls, or if you lack plumbing expertise. Remember, attempting DIY repairs without proper knowledge can worsen the situation and lead to costly complications.

Clean-up and Restoration Process
After calling a professional restoration service, you’ll need a thorough damage assessment to determine the full scope of water damage and necessary repairs. Considering that burst pipes can release over 50 gallons per minute, immediate professional assessment is critical for preventing extensive damage. Your restoration team will strategically place industrial fans, dehumidifiers, and specialized drying equipment to eliminate moisture from affected walls, floors, and hidden spaces. You’ll want to monitor the drying progress daily, typically taking 3-5 days, while ensuring proper documentation for insurance purposes.
Professional Damage Assessment
Since water damage can spread rapidly and cause hidden structural issues, a professional damage assessment is vital for developing an effective restoration plan. During the damage evaluation, certified professionals will employ various assessment techniques, including moisture meters and thermal imaging, to identify the full extent of water infiltration.
- Document all visible damage with detailed photographs and measurements
- Use specialized equipment to detect moisture levels in walls, floors, and ceilings
- Create a comprehensive inventory of affected items and structural components
- Identify potential safety hazards, including electrical and structural risks
- Determine the necessary scope of restoration work and required equipment
You’ll want to verify your assessment professional is IICRC-certified and experienced in water damage restoration. Their detailed documentation will be essential for your insurance claim and will guide the entire restoration process.
Drying Affected Areas
Once your professional assessment is complete, the clean-up and restoration process begins with a systematic approach to water removal and drying. You’ll need to start from the top down, focusing first on ceilings and walls before addressing floors to prevent water from dripping onto already-dried areas.
Position commercial-grade dehumidifiers strategically throughout the affected space while maximizing air circulation with heavy-duty fans and air movers. Open windows and doors to improve ventilation, but make certain you’re wearing protective gloves when handling potentially contaminated materials. If you have wet carpets or rugs, hang them to dry or contact professional cleaning services. For best results, maintain continuous dehumidifier usage and airflow until moisture readings indicate the area is completely dry. This systematic drying process helps prevent secondary issues like mold growth and structural damage.
Working With Your Insurance Company
The successful handling of a burst pipe insurance claim depends on three critical actions: understanding your policy coverage, documenting the damage thoroughly, and communicating effectively with your insurance provider. Before starting the claims process, review your insurance policy to confirm coverage for sudden and accidental water discharge.
- Take extensive photos and videos of all affected areas immediately
- Create a detailed inventory of damaged items with values and purchase dates
- Keep all receipts from emergency plumbers and restoration services
- Document every action you’ve taken to prevent further damage
- Record all communication with insurance representatives and contractors
Contact your insurance company promptly to initiate the claim, providing your policy number and comprehensive documentation. If you’re not satisfied with the initial offer, don’t hesitate to negotiate using independent estimates and professional assessments to support your claim’s value.
Safeguarding Against Future Pipe Bursts
After securing your insurance claim, preventing future pipe bursts becomes your next priority. Start by installing proper pipe insulation in vulnerable areas, especially in unheated spaces like basements, crawl spaces, and garages. Use foam or fiberglass materials, guaranteeing they’re correctly fitted around all exposed pipes.
Focus on comprehensive draft sealing throughout your home. Apply weatherstripping and caulk to seal gaps near pipes and eliminate cold air infiltration points around windows and doors. Maintain your home’s temperature at a minimum of 55°F, even when you’re away, and leave cabinet doors open beneath sinks during severe cold spells. Install a pressure regulator to manage water flow, and don’t forget to disconnect outdoor hoses and shut off exterior spigots before winter arrives. Regular inspections of these preventive measures will help guarantee their continued effectiveness.
Frequently Asked Questions
How Long Does It Typically Take for Pipes to Thaw Naturally?
You’re facing a tense situation when your pipes freeze, and natural thawing isn’t your best option. While it can take anywhere from 4-24 hours for pipes to thaw naturally, depending on temperature and pipe insulation, you shouldn’t wait it out. This slow process increases your risk of pipe damage. Instead, focus on active thawing techniques like using heat tape or raising your thermostat. Remember, the longer pipes stay frozen, the higher your risk of bursts.
Can I Use a Hairdryer to Thaw Frozen Pipes Myself?
Yes, you can safely use a hairdryer to thaw frozen pipes, but you’ll need to follow specific safety protocols. Keep the hairdryer at least 6 inches from the pipe and move it continuously in a back-and-forth motion. You should maintain a thawing pace of about 1 foot per minute. Always keep the faucet open during the process, and don’t let the pipe get too hot to touch. Consider alternative thawing methods if the hairdryer isn’t effective.
Will My Water Bill Increase Significantly Due to a Burst Pipe?
Imagine this: Your monthly water bill arrives, and it’s shockingly high. Yes, a burst pipe will significantly increase your water costs. Even a tiny 1/16-inch leak wastes 28,300 gallons monthly, while a larger 1/4-inch burst can lose up to 456,800 gallons. The cost implications are substantial – you’ll face not only the heightened water bill but also potential property damage expenses. That’s why it’s essential to address pipe issues immediately.
Should I Turn off My Water Heater When Pipes Burst?
Yes, you should immediately turn off your water heater when pipes burst as part of essential burst pipe precautions. This step prevents potential damage to your water heater and maintains water heater safety. First, shut off the main water supply, then turn off your water heater’s power source (electric breaker or gas valve) to prevent the unit from running dry or overheating. This protects your equipment and helps minimize further complications during repairs.
How Can I Identify Pipes Most at Risk for Freezing?
While you might think all pipes freeze at the same rate, certain locations are far more vulnerable. You’ll find the highest risk in unheated spaces like basements, attics, and crawl spaces. Check pipes along exterior walls, especially in cabinets under sinks, and any outdoor lines like hose bibs or pool supply pipes. Poor insulation methods or gaps near utility lines make these areas particularly susceptible. Focus your winterization efforts on pipes exposed to temperatures below 20°F (-7°C).
3 Responses